Top
Week 9
Planning to build a personal computer
When planning to build a PC it is important to ensure that your work areas are ready for the task as some of the components that are being installed into a system can be expensive and delicate where they could be made unusable because of electrostatic discharge.
We will look at the key requirements of planning to build a PC.
Tools required
Having the right tools will always make a job easier. This is very true in the building of any computer as some components may use screws that are not standard sizes, specialist devices that are used to reduce and minimise potential damage to components .
o antistatic equipment,

Antistatic packaging, wrist straps, antistatic mats are commonly used tools and materials to protect potentially expensive equipment from static electrical currents generated by a person. The generation of static electricity is easily done, it could be by shuffling of feet over a carpet or wearing clothing that is able to build up static by simple movement.
o computer toolkits,

Tools kits for the assembly of PCs and Laptops can be fairly specialist. It is common for PCs and Laptops to use torx screws and very small phillips head screws. Special precission screw driver kits offer PC builders a range of screw heads attachments to cover all possible types. An unsual tool that can be found in a tool kit are a pair of tweezers, these are very handy to have if small screws ping off in to awkward areas of a system, this is very common in laptops and some other smaller form factor PCs.
o heat compound
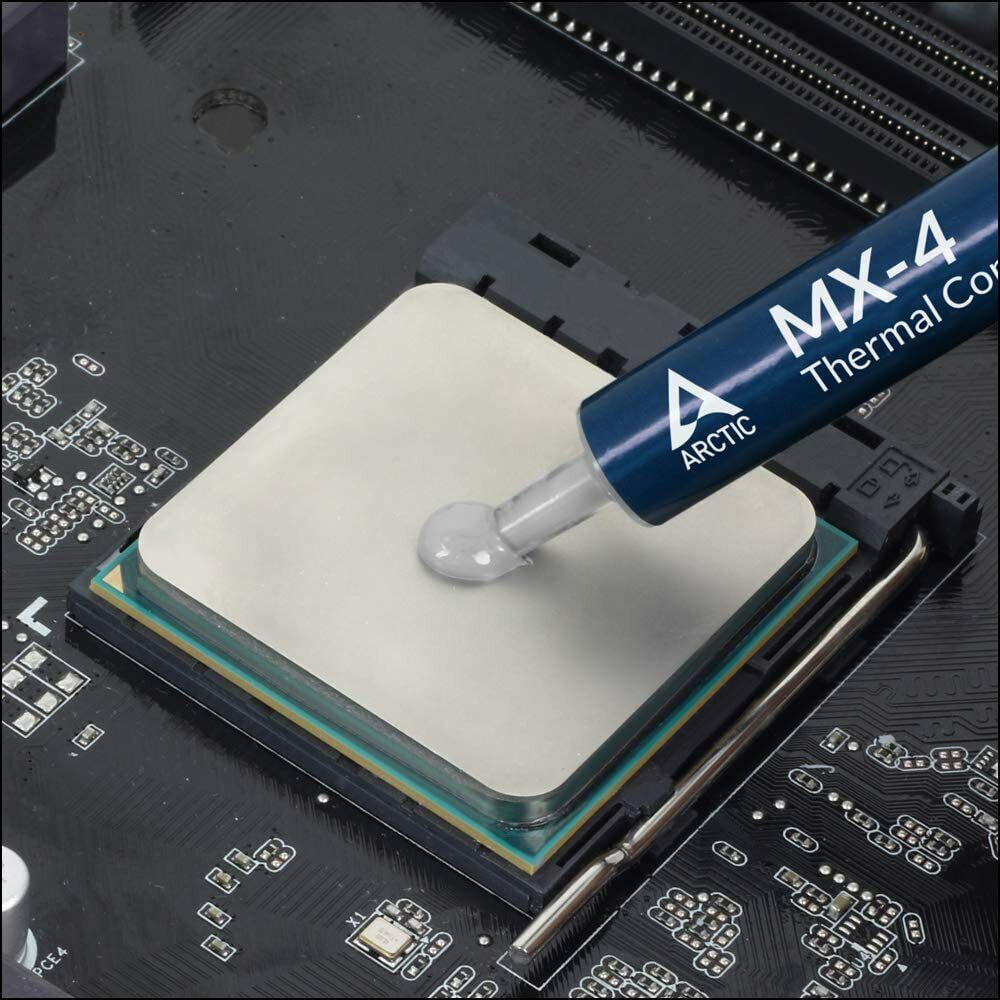
A product/tool that is very important to include in any tool kit is Thermal Paste/Heat Compound. This paste is used to create a bond between the top part of the CPU case and the bottom of the cooling device, this could be a large metal heat sync or water cooling pads. As discussed in earlier weeks this device is very important to protect the CPU device and this paste enables great heat pass through for the component.
Compatibility check of hardware and software components, e.g. case connectors, drive connectors, processor/socket connectors, memory/slot connections
Health and safety assessment of the build process
o personal electrical safety
It is vital to ensure that your own safety has been taken in to consideration when looking to build any computer. You will be working with equipment that uses electricity that could hurt, injure or even kill you. Electrical components within the computer system are able to store power whilst not even being plugged in to the mains socket. This power is in most circumstances stored within capacitors that can be found on the motherboard and power supply units.
Careful consideration must be taken when planning to work on these. Devices could be plugged in to the mains socket BUT WITH THE POWER OFF AT THE SOCKET, this would provide an earth to any stored power to go to if the device has it.
o antistatic to computer being assembled
Static is a charge that is considered to be a potential hazard to computers as it can short circuit power sensitive components. Static can be built up and stored on people very easily by small movements creating friction which on some materials generates enough voltage to create a spark of electricity
There are other measures to how to reduce static other than Linus'. Large organisations ensure that thier employees wear coats and gloves that will suppress the generation of this static charge, however, in a personal and home setting there are inexpensive wrist straps that will allow the user to connect a crocodile clip to a metallic object that is in some way connected to a power source that has an earth.
Installation sequence, e.g. collect tools, prepare workstation, assemble motherboard, fit storage devices, install operating system software
When you are thinking of building your own personal computer, you'll probably want to get it done quickly so that you can play on it and see how far you can push it. But STOP! This could result in you have it to take bits out after you have installed them because other parts are in the way, or even worse, you could damage that component that costs the most.
Planning of the installation and build of the PC should be taken seriously. It would be advisable to follow the below steps in the building of the PC;
1. Gather Your Components:
- CPU (Central Processing Unit): This is like the brain of your computer. Popular choices include Intel Core i5 or AMD Ryzen 5.
- Motherboard: It's like the backbone of your PC, connecting all the components together. Look for one that's compatible with your CPU and has the features you need. For example, an ASUS Prime B550M-A or MSI B450 TOMAHAWK MAX.
- RAM (Random Access Memory): This helps your computer run programs smoothly. Aim for at least 8GB to start with. Corsair Vengeance LPX 8GB (2 x 4GB) DDR4-3200 is a good choice.
- Storage: You'll need a storage device for your operating system and files. Options include SSDs (like Samsung 970 EVO) for speed or HDDs (like Seagate Barracuda) for more storage space.
- Power Supply (PSU): This provides power to all your components. Choose one with enough wattage for your setup, such as EVGA 600W or Corsair CX550M.
- Graphics Card (GPU): If you're doing gaming or graphic design work, you'll need a dedicated GPU. Options include NVIDIA GeForce GTX 1660 or AMD Radeon RX 580.
- Case: This is where all your components will go. Choose one that fits your motherboard and has good airflow, like NZXT H510 or Cooler Master MasterBox Q300L.
2. Prepare Your Workspace:
- Find a clean, well-lit area with plenty of space to work.
- Ground yourself by touching a metal object to avoid static electricity, which can damage your components.
3. Install the CPU:
- Open the CPU socket on the motherboard.
- Carefully place the CPU into the socket, aligning the arrows or markings.
- Close the socket lever to secure the CPU in place.
4. Install RAM:
- Open the RAM slots on the motherboard.
- Align the notches on the RAM stick with the slot and gently press down until the clips click into place.
5. Install Storage:
- If you're using an SSD, attach it to a drive bay in the case using screws. For an HDD, mount it in a drive cage.
- Connect the storage device to the motherboard using SATA cables.
6. Install PSU:
- Place the PSU in the case's PSU bracket and secure it with screws.
- Connect the main power cable to the motherboard and other necessary cables to components like the CPU and GPU.
7. Install GPU (if applicable):
- Open the PCIe slot on the motherboard.
- Insert the GPU into the slot and secure it with screws.
- Connect the GPU to the PSU using PCIe power cables.
8. Connect Case Cables:
- Connect the case's power button, reset button, USB ports, and audio jacks to the motherboard headers.
9. Cable Management:
- Route cables neatly through the case to improve airflow and aesthetics.
10. Test Your Build:
- Connect a monitor, keyboard, and mouse to your PC.
- Power on the computer and check that all components are working properly.
- Enter BIOS to ensure all components are detected.
11. Install Operating System:
- Insert the OS installation media (USB drive or DVD) and boot from it.
- Follow the on-screen instructions to install the operating system (e.g., Windows 10, Linux).
12. Install Drivers and Updates:
- Install drivers for your motherboard, GPU, and other components from their respective manufacturer's websites.
- Update your operating system and drivers to ensure optimal performance and security.
Constraints (costs and technical), e.g. component cost, hardware and software availability, tools and component/device compatibility, software costs/licensing
There are and could be constraints to the building of a computer. These could be client constraints, financial constraints, time constraints, compatability consrtaints or contractual.
This could impact the final computers performance significantly, so let us look at what these constraints actual mean.
client constraints - If creating a computer for someone it is VERY important to FULLY understandin what they want and need, not what you think you would get. The client may be using the device for something that you don't understand and the purchase of a something like a high end graphics card would not be something that would best optimise the system against thier budget.
financial constraints - Oftern an issue for most of us when it comes to our own wish lists. We would all love to have a computer that has the best EVERYTHING in it but the costs are the point where we stumble. This cost limitation can be set by others that we might be building the PC's for. We have to be mindful of a set budget and try to meet this, but without sacrificing quality and performance.
time constraints - Some components and devices may need to be ordered to be able to have them in the systems, however, they maybe so popular that the time for them to arrive might be too late for the build of the PC to be able to be used by the person that needs it.
compatability consrtaints - Some systems are built for a specific purpose and as a result use specialit software and hardware that might not be standard. This could cause a problem laters if the system needs to be able to work together with other systems. Good examples of this could be a Windows PC on a Apple network or the other way around.
contractual constraints - This is where a company might have a special deal with manufacture for example Dell Technologies, they provide the company with computers and components at a reduced cost because of this the contract that Dell have suggests that the company must not use any other supplier for a period of time, e.g 2 years. The issue with this could be that dell haven't developed new equipment and others have and because of this your company is falling behind others that are able to purchase the newer and better technology.
Test plan
o functionality, e.g. testing that the personal computer powers on
o performance, e.g. testing how well different hardware components perform (speed, reliability and efficiency) individually and together within a personal computer, such as the processor, memory and graphics.
Last Updated
2024-03-26 11:40:14
English and Maths
English
Maths
Stretch and Challenge
Stretch and Challenge
Homework
Homework
Equality and Diversity Calendar
How to's
How to's Coverage
Anonymous Assessment - Learners assess an anonymous piece of work containing deliberate mistakes against given success criteria.
Anonymous Assessment - Learners assess an anonymous piece of work containing deliberate mistakes against given success criteria.
Links to Learning Outcomes |
Links to Assessment Criteria |
|
|---|---|---|
Learning aim B: Produce a plan to build a personal computer |
1B.2 Identify the purpose and ‘client’ requirements to build a personal computer.
1B. 3 Produce a plan to build a personal computer, with guidance, including: â— a list of hardware components and software resources â— a list of tools required â— a compatibility check of hardware components and software resources â— a health and safety assessment.
2B.P2 Describe the purpose and ‘client’ requirements to build a personal computer.
2B.P3 Produce a plan to build a personal computer, including: â— a description of hardware components and software resources â— a list of tools required â— a compatibility check of hardware components and software resources â— a health and safety assessment â— a test plan.
2B.M2 Produce a detailed plan to build a personal computer, including at least two alternative design ideas and an explanation of the installation sequence.
2B.D2 Justify final decisions, explaining how the personal computer will fulfil the stated purpose and ‘client’ requirements, and describing the impact of any constraints on the plan and design. |
Files that support this week
→
Next ←
Prev