week 7
Client-side scripting design tools and techniques
e.g. pseudocode, flowcharts (including use of British Computer Society (BCS) standard flowchart symbols) used to develop original code.
What is Pseudocode (pronounced, Seudo-code)? this diagram is used to represent the process and functionality of a code snippet or feature.
There are two main forms that this can be created,
BCS - British Computer Society Standard;

The example is taken from BBC Bitesize.
A further example of Pseudocode
| age = prompt user input | age=prompt("Please enter your age", ""); |
| if the age is > = (greater and equal to) 18 then |
if (age>=18 |
| print on the screen "You are 18+" | {document.write ("You are 18+");} |
|
else |
else |
| print on the screen "You are under 18, as you are X years old" | {document.write("you are under 18, as you are" + age + "years old");} |
Flow Charts standard.
Flowcharts use shapes that have a defined action that is then provided with text inside them to identify what is being done. The image below shows the typical symbols that are used and the actions that relate to them.
| Symbol | Description |
 |
The Oval shape is used to represent the start and end point of a process. |
 |
The arrow is used to connect shapes, providing the relationship between them, these can be labelled to define the selection if a choice is given in the symbol before. |
 |
The square is used to represent a process |
 |
A parallelogram is used to represent where and when an input or output will happen |
 |
The diamond shape defines a decision and choice, these can be yes no options. |
The image below shows these symbols in use for a simple system.
The image is taken from BBC Bitesize.
Pseudocode is often the basis for the code that is to be created, allowing for developers to understand loops, triggers, and processes that need to be created to enable it to function correctly.
A classic flowchart example
The following site uses some good examples and exercises to help you master these flowcharts
Coding time
The successful beginnings of any and all projects are effective and efficient planning that includes the creation of structure and organisation. In our first adventure into the creation of a website, we will learn to follow a series of basic principles and practices.
As a former college and university student myself, I, at times, created files and folders that were named inappropriately. Files and folders were named "a", "college stuff", "web lessons", "111" and my favourite "college crap". Whilst at the time of naming these appeared logical, and, how can I ever forget with names like that what they actually were all about! Well, you do forget and then you begin your treasure hunt for the file at the time you most need it. Have you been there? Yes!
So in our good practice going forward, we shall for ALL our web activities and practice, create a folder for the project, and then give it an appropriate name!
Step 1.
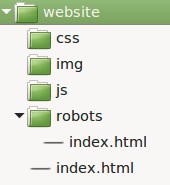
Create your self a new folder in your storage area called "001-structure"
Step 2.
Open your prefered text editor (i would recommend that you use Notepad++).
Step 3.
Click on file and select new from the menu.

Step 4.
Now save the file into your created folder "001-structure". as this is our first page for this web project, and our landing page, we shall name it "index.html" ENSURE THAT YOU DO NOT USE ANY CAPITALS IN YOUR FILENAMES! Select "Save as.." then use the following dialogue box to save the file.
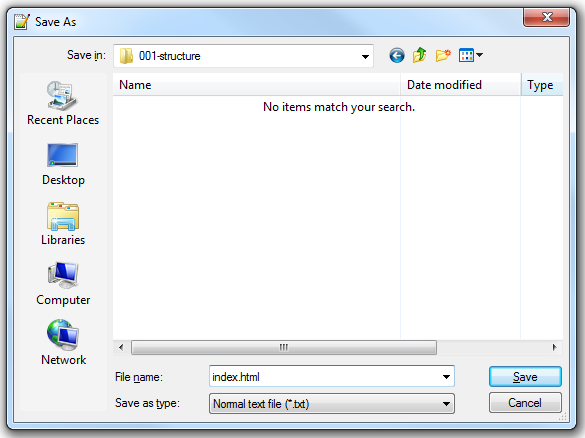
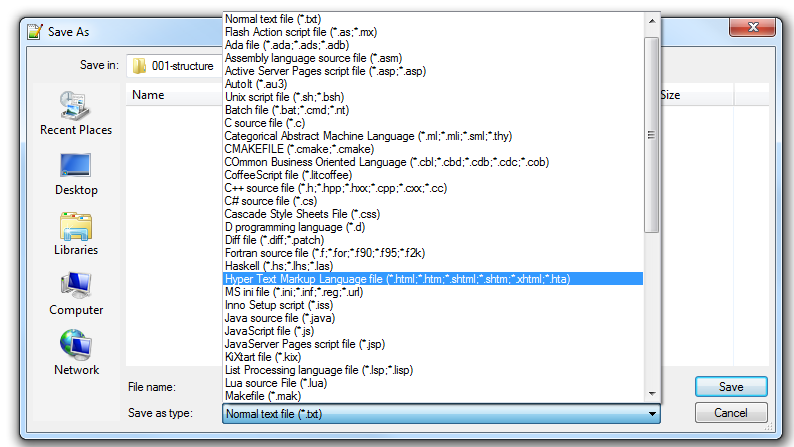
When typing in the file name, either add the ".html" to the end of the filename, without a space between the filename and .html or you can select the save as file type drop down and selects the correct file type as shown below.
Step 5.

The above image demonstrates the start and declaration of an HTML 5 webpage. The use of declarations is used to enable the web browser to understand the markup (Coding) that will be used in the file that is being loaded. There are a number of Data Type Definitions used in the creation of web pages, these relate to the different standards used in the file. The table below, taken from W3schools shows the development of the web and standards.
| Year | Version |
|---|---|
| 1989 | Tim Berners-Lee invented www |
| 1991 | Tim Berners-Lee invented HTML |
| 1993 | Dave Raggett drafted HTML+ |
| 1995 | HTML Working Group defined HTML 2.0 |
| 1997 | W3C Recommendation: HTML 3.2 |
| 1999 | W3C Recommendation: HTML 4.01 |
| 2000 | W3C Recommendation: XHTML 1.0 |
| 2008 | WHATWG HTML5 First Public Draft |
| 2012 | WHATWG HTML5 Living Standard |
| 2014 | W3C Recommendation: HTML5 |
| 2016 | W3C Candidate Recommendation: HTML 5.1 |
Step 6.
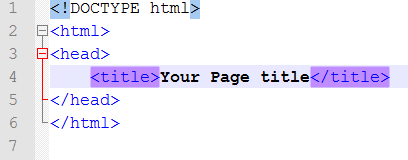
The head area of a webpage is where key information like the page title goes. The page title must not be excessively long as it will not full show up on the tab or window title area if too long as can be seen below.


Step 7.
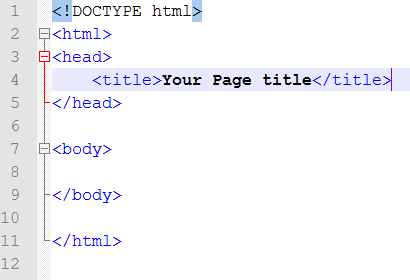
The body tag on a webpage is where the content that is to be displayed on the screen goes.
Step 8.
.png)
Here we have added a paragraph tag. This tag should be used when sentences and paragraphs are created.
Step 9.
Now save your page, select Run and then choose your prefered browser.

Step 10.
Marvel at your creation. Congratulations you have created your first webpage.
Add some comments to your page to remind yourself what each part does to do this you need to add the following

Now that you have a template structure we will investigate more tags.
Consider the following image,
In this newspaper, there are a number of headings that have been used to grab certain levels of attention and provide enough detail to enable users to simply read part of it to understand what it's about and what has happened.
Count how many sizes of headings that there are in the article.
We are able to do the very same in our websites using certain web tags, these are known as heading tags. we can write these as follows,

Heading 1
Notice that these have an open tag and a close tag, remember most NOT ALL html tags will have a close to them.
Create heading tags in your template file, increase the number inside of the tag until no further changes happen to the text, what is the value that you get to?
Now that you have created a heading reflect back on the image of the newspaper what follows on from these headings? Yes, paragraphs and sentences, as with the newspaper web pages require these too, in order to have a correctly formed html webpage text should be written within a series of paragraph tags. If you do create some text out of these containing tags it will still be presented to the user, however, if any formatting to text in the html page happens later using additional code called CSS (Cascading Style Sheets) it will not be included. A paragraph tag looks as follows,

This is a paragraph
Using the template page that you have created add some paragraphs to your body content, you may wish to use some lorem ipsum text to fill out your containers.
Last Updated
2018-04-16 13:27:00
Links to Learning Outcomes |
Links to Assessment criteria |
|
|---|---|---|
|
B.P2 Produce designs for a website that meet client requirements. B.M2 Justify the design decisions, explaining how they will meet the user's needs and be fit for purpose. BC.D2Evaluate the design and optimised website against client requirements. |
Learning aim B: Design a website to meet client requirements B.P2 Produce designs for a website that meet client requirements. B.M2 Justify the design decisions, explaining how they will meet the user's needs and be fit for purpose. BC.D2Evaluate the design and optimised website against client requirements. |
English
Pseudocode - Before designing an algorithm it is important to first understand what the problem is. Algorithms can be designed using pseudocode or a flowchart, and the standard notations of each should be known. (BBC Bytesize)
Maths
Ratios: Calculating ratios, applying ratios, Scales e.g. Maps
Collect and record data: Questionnaires, Observation, Tally
How 2's Coverage
Clarifying Learning Objectives - Using coloured discs and/or peer explanation, check to ensure that learners have understood the learning objectives.
-
Files that support this week
Week 6←
PrevWeek 7←
PrevWeek 8←
Prev→
Next→
Next

